Getting Started on Near BOS as a Web2 Developer
Embarking on the Near BOS Journey: Simplifying Decentralized Web Development for Web2 Developers. A Step-by-Step Guideline to Getting Started

Unorthodox Web Engineer
The Blockchain Operating System (BOS) makes it easier to create, share, and use decentralized websites. It's like a toolbox where you can quickly get pieces (components) to build your site. It functions as a development and social environment, offering users effortless access to components, seamless forking of other users' components, and convenient deployment on the near network. In contrast to Web2 applications, where the typical workflow involves building, pushing changes to GitHub, and then deploying the application, BOS provides a swift alternative. With BOS, users can effortlessly create a component, deploy it on-chain within minutes, and instantly preview their work on a Gateway (near.social or near.org.) This eliminates the need to push changes to GitHub, enhancing security by ensuring components remain on-chain. Additionally, deploying on BOS is notably faster than traditional methods, enabling the deployment of new front-ends for smart contracts to the mainnet in a matter of minutes.
Keywords to Note (The 3 Pillars of BOS)
A few key terms to pay attention to, which you've either encountered or will encounter throughout this article, are crucial for a comprehensive understanding when working with BOS, as they constitute the foundational elements of the system:
Components: These are composable frontends that solve specific problems, akin to React, if you're familiar with React, Navigating BOS development would be relatively straightforward. There are also a couple of built-in components that come in handy (I'll be discussing this later).
Blockchain: Remember I mentioned the code is being stored on-chain, Think of this as GitHub on how code is being stored on web2, this is to store the component's code as well as assets and data. This is done on the Near chain.
Gateways: Think of these as hosting platforms similar to Vercel. Gateways serve as platforms that deliver decentralized frontends (components) to a wider audience. e.g. near.org, near.social
Getting Started
The first thing to note when getting started is that you're building on Near and all your changes are being deployed on-chain. Hence, you need to create a near account, and deposit a small token for gas purposes. I recommend utilizing Meteor Wallet and installing its extension in your browser for a swifter experience in saving changes. This is notably faster than employing the mynear app, which redirects you to another window everytime you want to deploy. Saving each time on chain requires you to sign a contract (Don't worry the gas you need to deploy is not much at all, In fact, depending on your project, it might take weeks before you exhaust a single Near token).
Next Steps...
Once you're done with the step next thing is to start building. Again, this is just my suggestion as I consider the fastest way to build and deploy easily on BOS.
Head over to jutsu.ai, and log in using the near account you just created.
As I mentioned earlier, if you're familiar with React, you would recognize most of the concepts but not everything in React is fully integrated. Currently, only useState useEffect useCallback useMemo have been integrated on BOS, I'll be showing you how to use them.
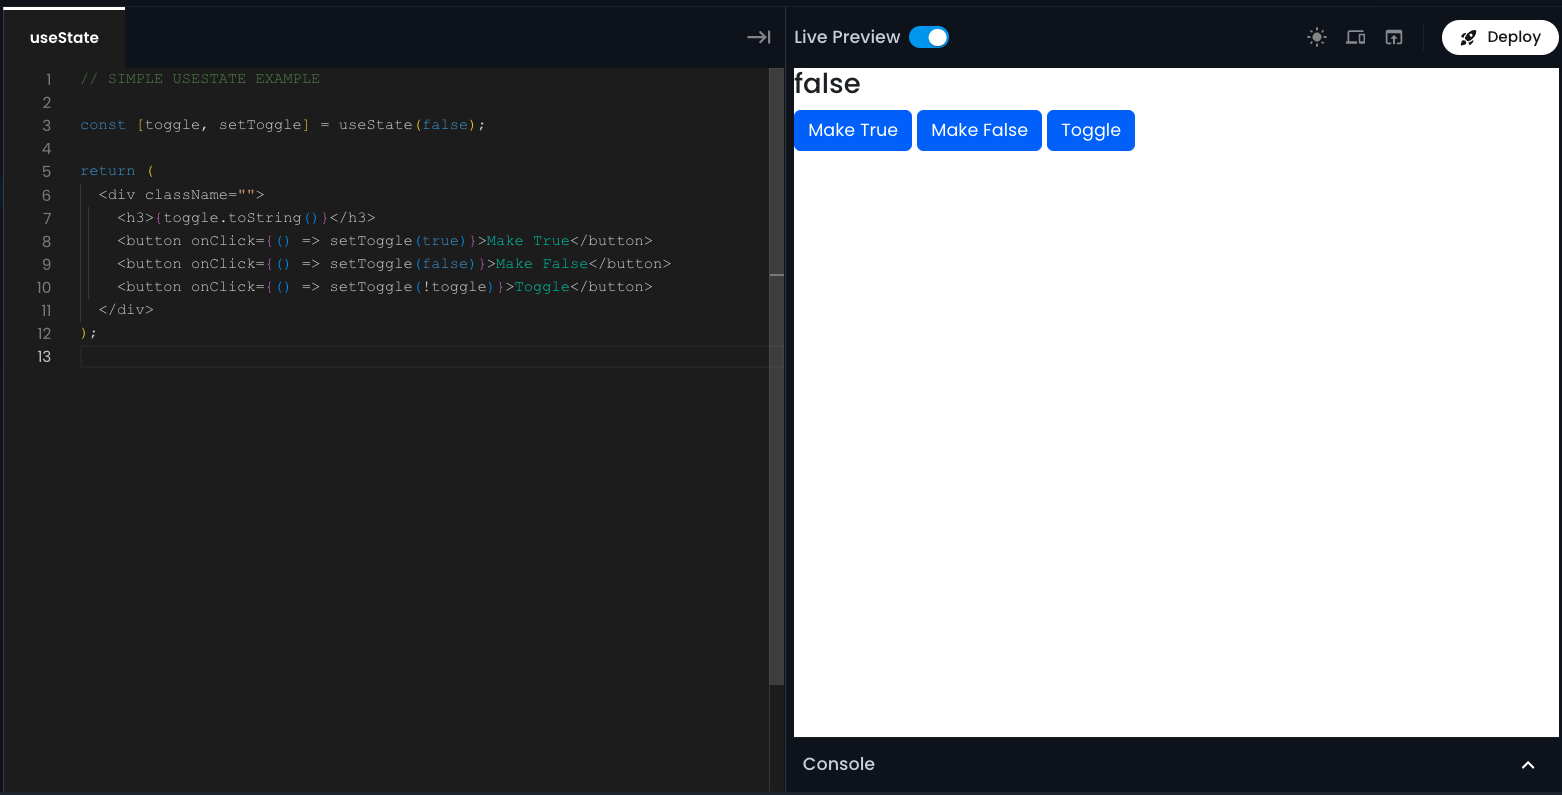
In the Image Example above, I created a simple toggle button component using the useState hook. a couple of things to take note of:
You don't need import statements, everything is happening behind the scenes, you just need to call the hook.
whatever JSX code you pass in your return statement is what is being rendered in the preview screen.
the deploy button on the top-right is used to deploy on-chain and you can view your application in any gateway(Link to the above example, this example took me less than 10 minutes to build and deploy).
you also have access to your console, which is useful for debugging.
BOS 101 - How is the BOS VM Different?
The BOS VM comes with some functions and components already setup, with ongoing additions. It's essential to note that it doesn't function exactly like React, so processes may not align precisely.
Unlike React, you don't import hooks with statements; you just initialize them when you need them.
There is no such thing as having a general
App.jswhereby you have to call the function and export it in order for it to work, that's not how components (BOS) work, just return your JSX code it's that simple.You can't just simply download any npm package and import, you have access to a couple of built-in packages that you could work with.
fetch: the fetch function on BOS acts like a hook, instead of returning a promise, it returns a value.const res = fetch("https://rpc.mainnet.near.org/status"); return res.body;asyncFetch: this is the version that returns a promise, in case it is mandatory that you handle the API call asynchronously:function reportUptime() { asyncFetch("https://rpc.mainnet.near.org/status").then((res) => { const uptime = res.body.uptime_sec; Near.call("uptime.near", "reportUptime", { uptime }); }); } return <button onClick={reportUptime}>Report Uptime</button>;Caching: The VM implements a caching layer for most network requests, but in case you want to handle it manually you have access to the
useCachehook.const status = useCache( () => asyncFetch("https://rpc.mainnet.near.org/status").then((res) => res.body), "mainnetRpcStatus", { subscribe: true } ); return status;list of Primitive APIs available on BOS - here.
BOS 102 - Widgets and Props.
Widgets are predefined components (Components that have already been built and deployed) that allow you to include an existing component in your code, Think of it as importing another component in your code, thereby breaking down complex long code to make your code cleaner and live in seperating components. Here are some tips about widgets:
Widget has a
srcproperty in which you pass the component you're trying to import, you get an error if your component is wrong or not deployed yet.Props: just like React Components, you can also pass in props to widgets but in the VM you have to make sure you call the
propsand pass your props into the object.

In the previous example above I defined a useState example, we can see (the Image above) that all I did here was import the component in the form of a widget, and just like that the the component is rendered in this component and we can also build on this as much as we want. This allows us to break large components into smaller bits and make our code cleaner and easily readable.
Useful built-in Components
Image Uploader: for handling image upload on BOS, All images on BOS are uploaded using the built-in component called
IpfsImageUpload,the images are uploaded to the near social IPFS and you get the returned hash in an object, you extract the hash from a field calledcidconst [state, setState] = useState(null) return ( <div className='container row'> <div> Image upload: <br /> <IpfsImageUpload image={state} /> </div> <div className='mt-2'> {state.img.cid && ( <img src={`https://ipfs.near.social/ipfs/${state.cid}`} alt='uploaded' /> )} </div> </div> );Web3 connect: The BOS is chain-agnostic, making it a flexible solution for developers working with different blockchains (EVM chains like Ethereum, polygon, celo).
 return (
   <div>
     <Web3Connect />
   </div>
 );
 // The Web3Connect Component gives you access to Metamask, Wallet Connect and Ledger
 // In order to connect to different chains
BOS 103 - Styling on BOS
styling on BOS is quite different from React, as it is done with the built-in Styled Component or Bootstrap, so if you're familiar with either of them you would be able to work style your components easily, if you're not you could always check their docs on getting started.
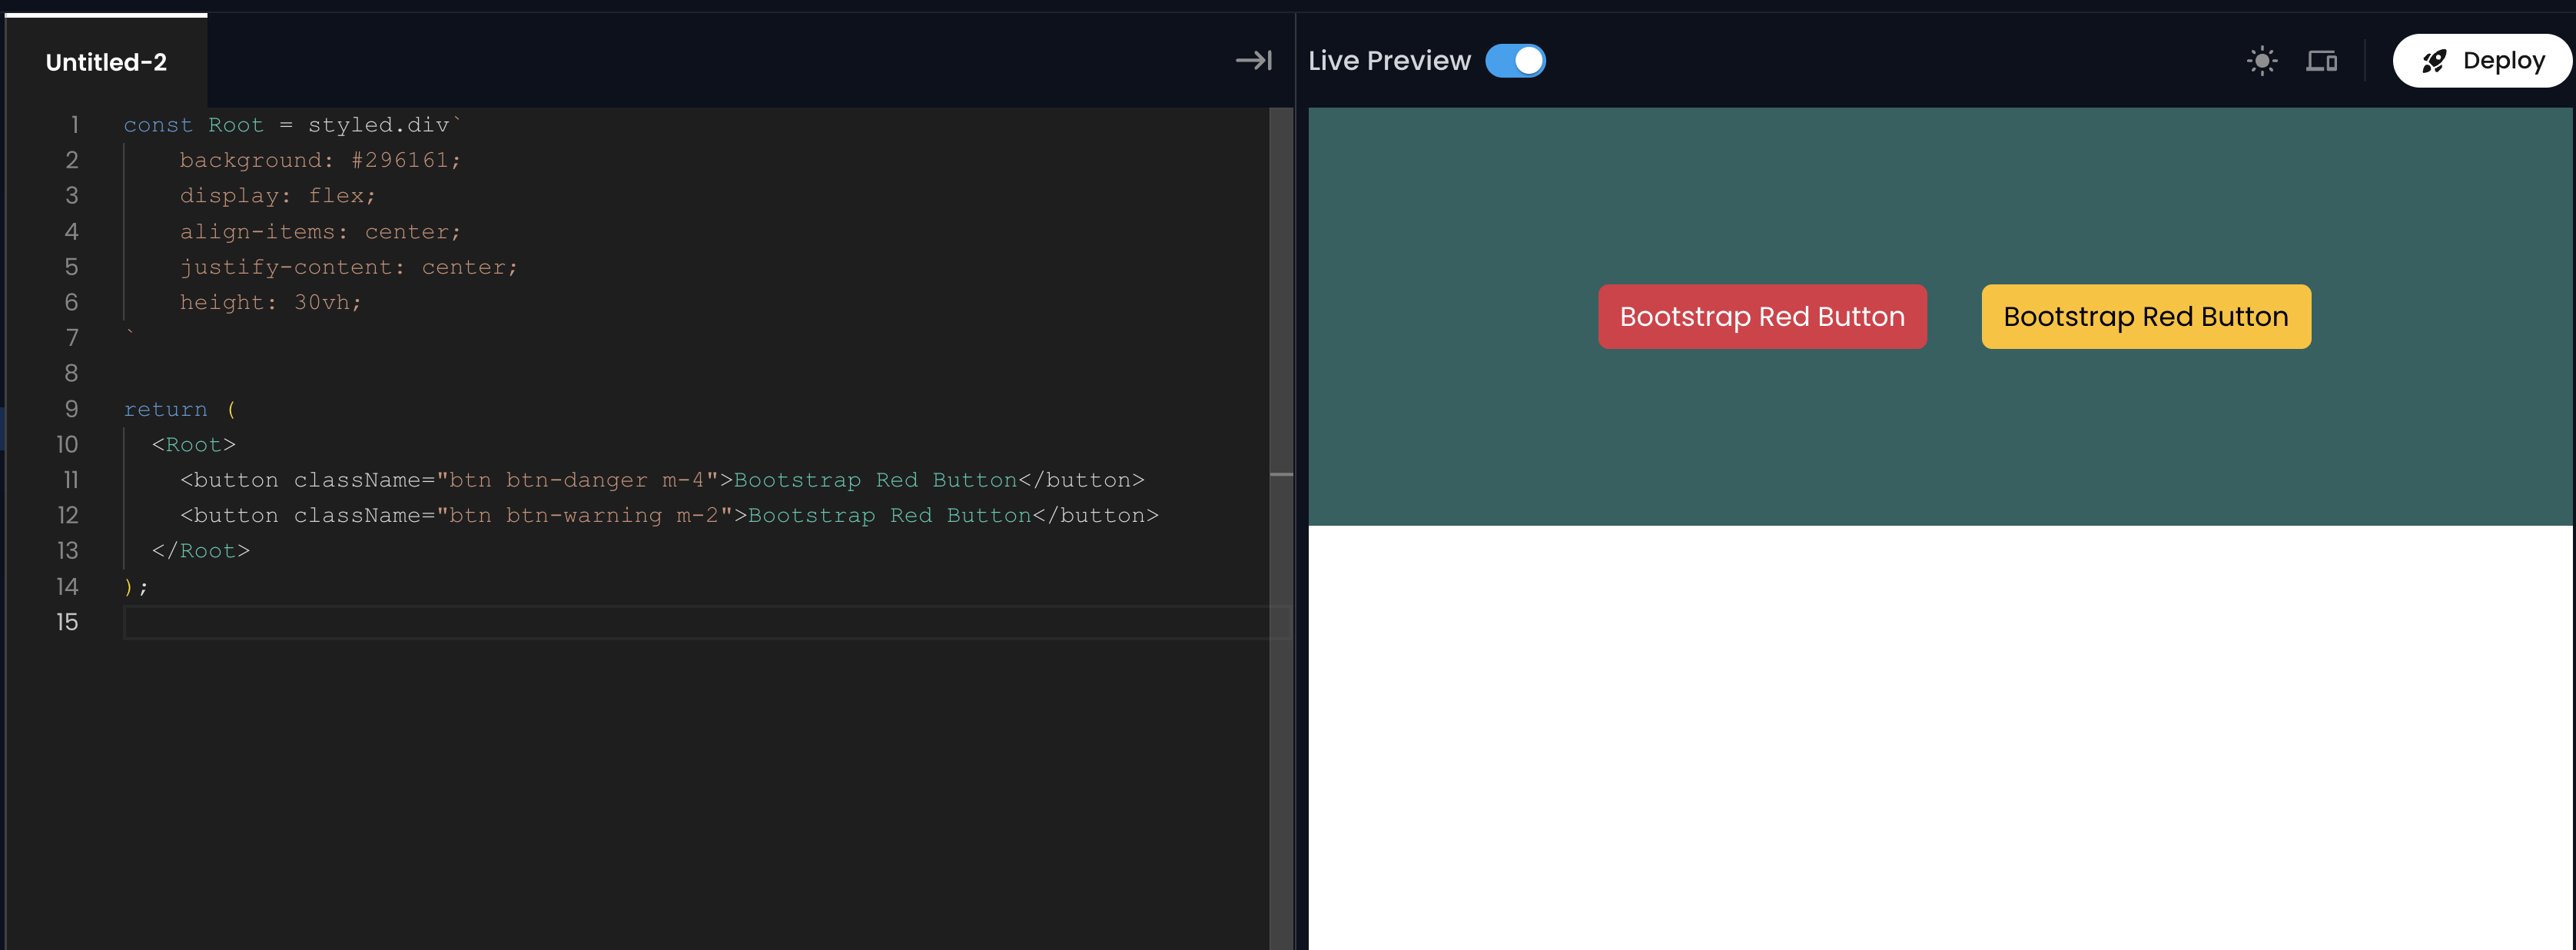
As seen in the example above I used Styled-Component to style the Root container and I used Bootstrap to style the buttons. you can choose to use both or either of them, depending on the one you're comfortable with.
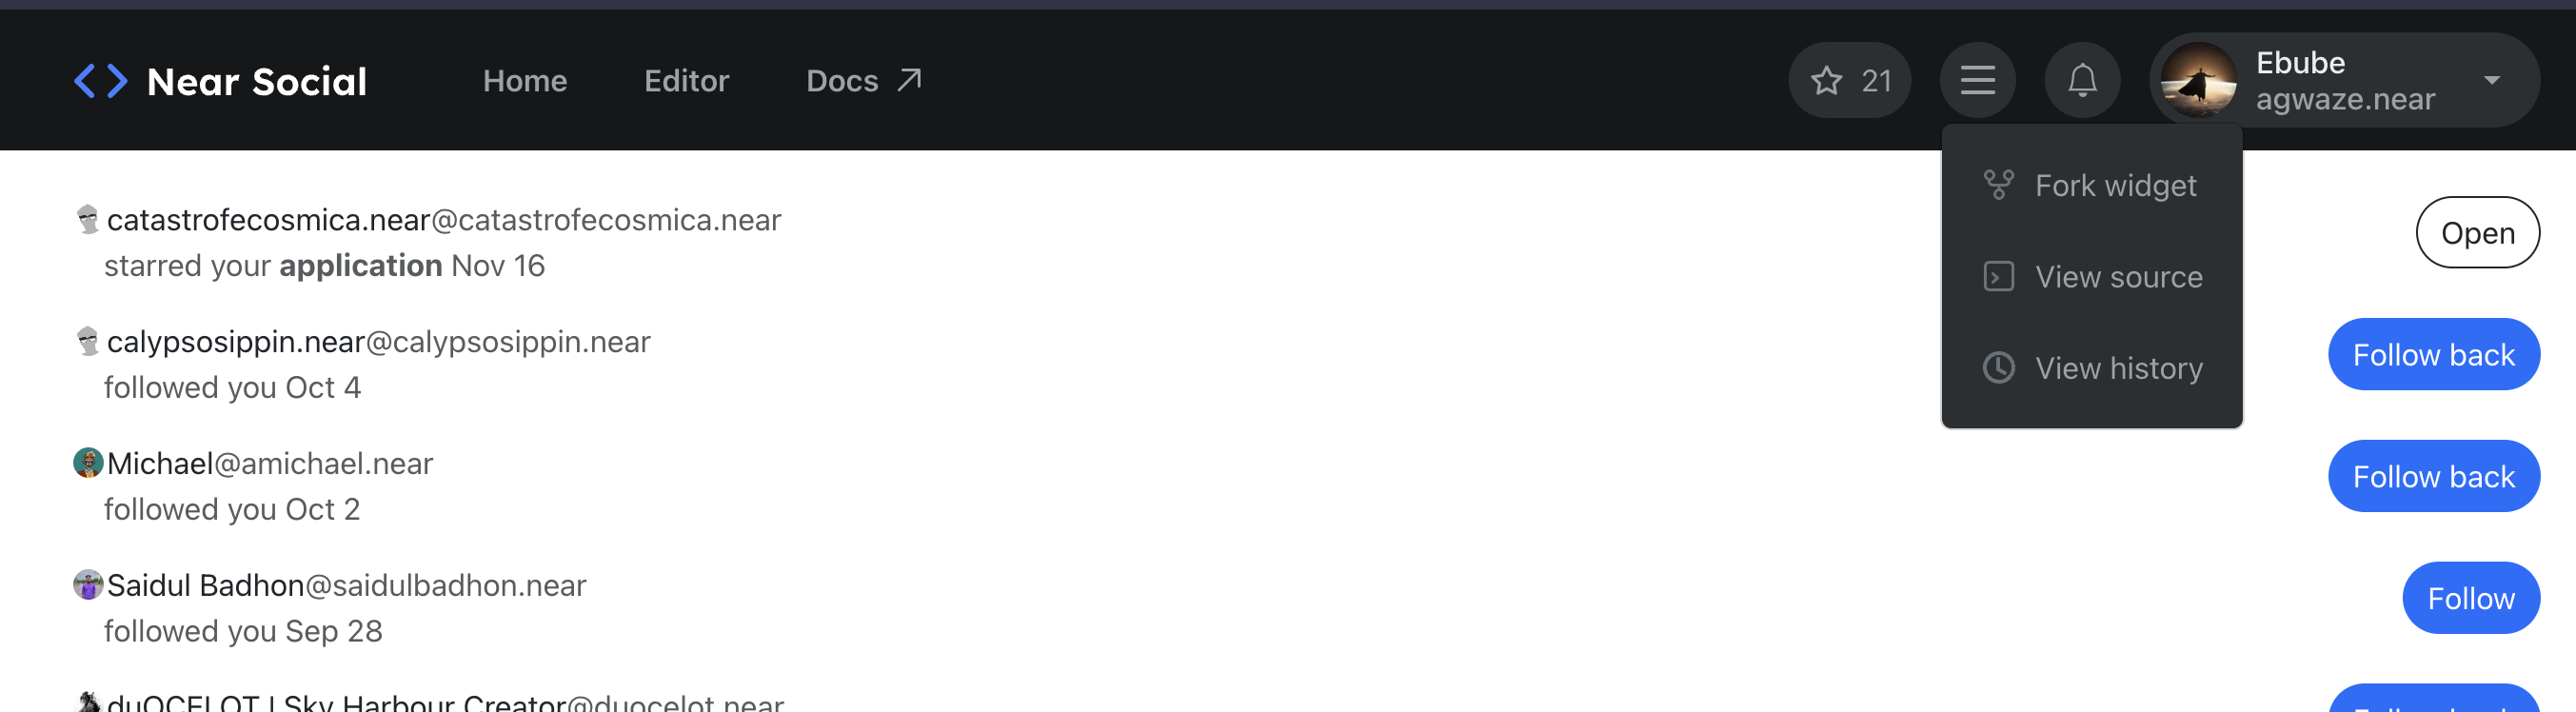
How to Fork a Widget on BOS
Yes, Forking is also possible on BOS, You can effortlessly fork a component, either to further develop it or to run it locally and study it. In this visual example, I'm utilizing the Near social gateway, and you can find the fork button in the top menu bar on the right.
Conclusion
Starting out with Near BOS as a Web2 developer opens up a whole new way to build websites. BOS makes it easy with its toolkit, letting you grab pieces and quickly create your site on the Near network. It's different from how we usually do things on regular websites.
Think of BOS like a box with three important parts: Components, Blockchain, and Gateways. They work together to keep things safe and accessible. It's a simple, secure, and efficient way for Web2 developers to explore the world of decentralized applications. Start your BOS journey and see where it takes you!
For a deeper understanding on BOS visit the docs


